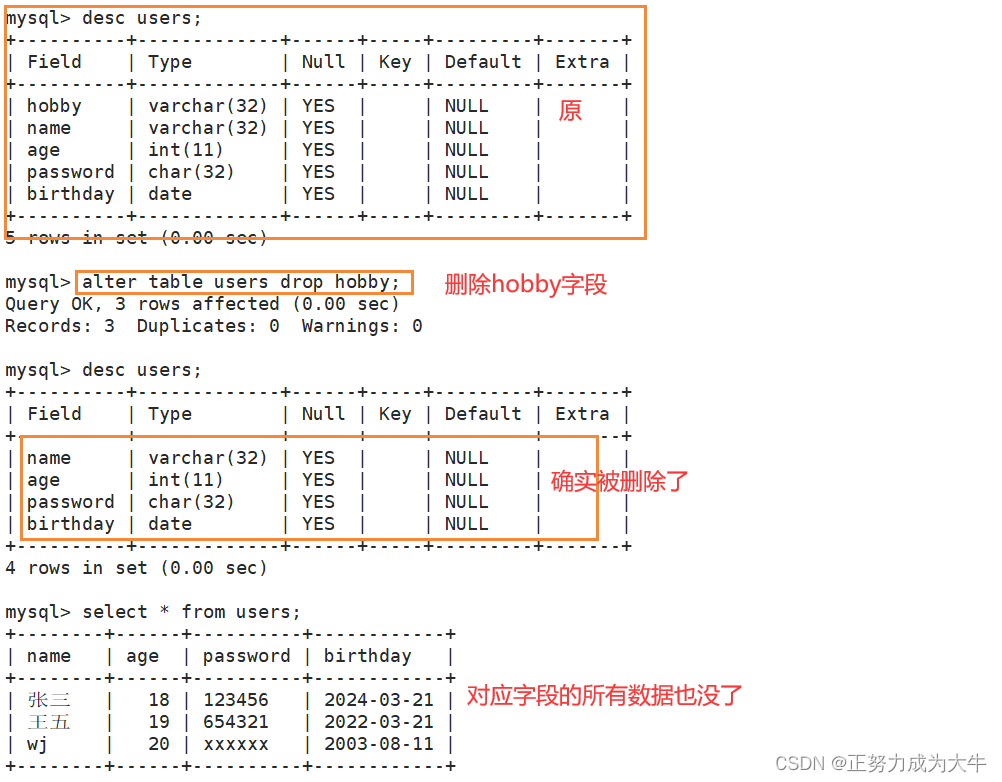
本地环境:
node版本:20.10.0
目录
一、搭建环境
二、创建项目
三、修改页面
四、封装路由vue-router
五、element-plus
六、安装scss
七、封装axios
一、搭建环境
1、安装vue脚手架
npm i -g @vue/cli2、查看脚手架版本
vue -V
3、切换路径到需要创建项目的地方
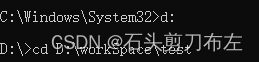
二、创建项目
1、创建项目
npm create vite@latest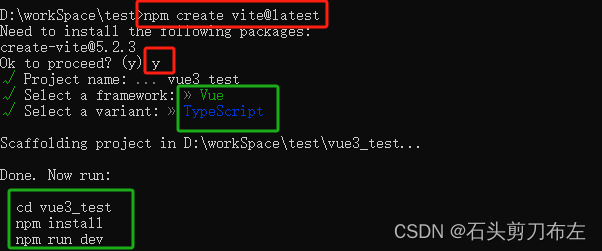
2、根据提示依次输入以下命令:(安装依赖并运行项目)
1、cd vue3_test  //切换到项目根目录下
2、npm i         //安装依赖
3、npm run dev    //启动项目
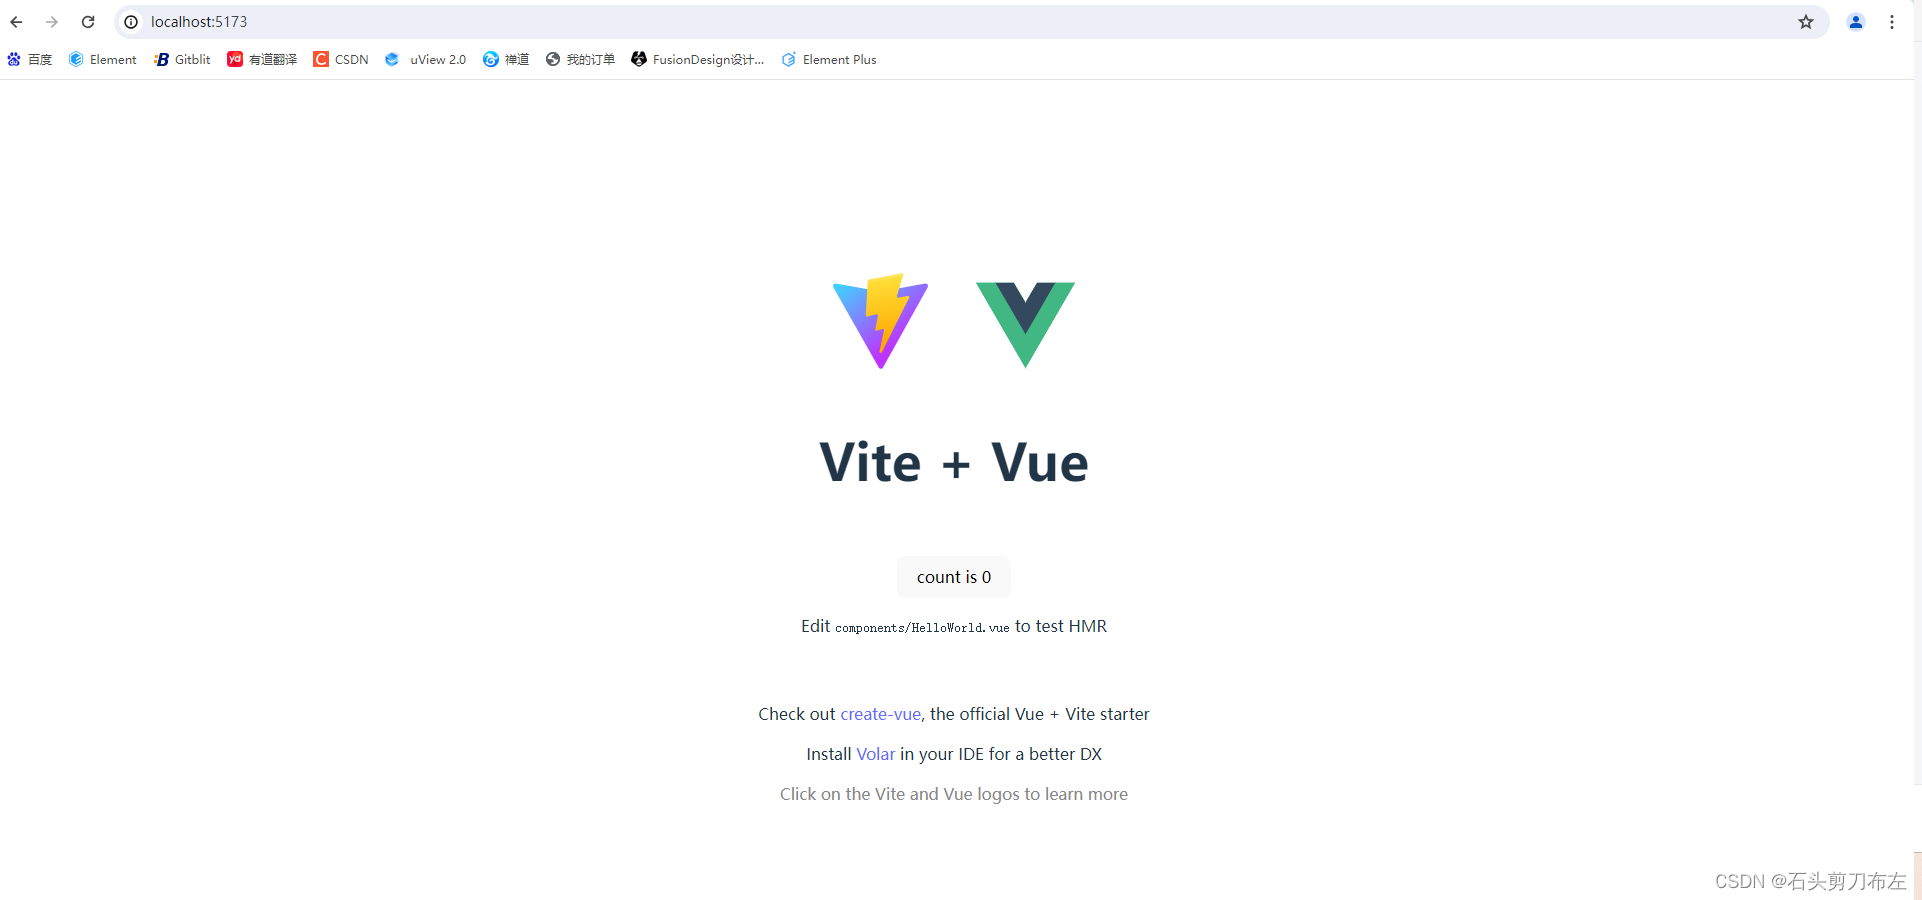
3、浏览器打开
三、修改页面
1、删除原本的helloword页面,在src下新建view/home/index.vue文件
2、修改App.vue文件
在 Vue 3 中,<RouterView> 组件是 Vue Router 4 的一部分,用于渲染匹配到的路由组件。
<script setup lang="ts">
</script>

<template>
  <RouterView></RouterView>
</template>

<style scoped>

</style>
四、封装路由vue-router
vue3需要安装4.0以上版本
vue2需要安装4.0以下版本
1、安装路由
npm i vue-router2、在src下新建router/index.ts文件
router/index.ts
// src/router/index.ts
import { createRouter, createWebHashHistory } from "vue-router";
const routes: any = [
  {
    path: "/",
    redirect: "/index",
  },
  {
    path: "/index",
    component: () => import("../view/home/index.vue"),
    name: "Index",
    menuShow: true,
  },
];
const router = createRouter({
  history: createWebHashHistory(),
  routes: routes,
});

export default router;
3、在main.ts中引入
main.ts
import { createApp } from 'vue';
import router from './router/index';
import App from './App.vue';

const app = createApp(App);
app.use(router);
app.mount('#app');
五、element-plus
1、安装
npm install element-plus2、全局引用
//main.ts
import { createApp } from 'vue';
import './style.css'
import App from './App.vue';
import router from './router';
import ElementUI from 'element-plus'; // 引入Element Plus配置
import "element-plus/dist/index.css"

const app = createApp(App);
app.use(router);
app.use(ElementUI);
app.mount('#app');
六、安装scss
npm install sass七、封装axios
1、安装axios
npm i axios2、src下新建utils/axios.ts文件
// axios.ts
import axios from "axios";
import { ElMessage } from 'element-plus'
const service = axios.create({
    baseURL: '',  //访问后端接口,例如:192.168.1.131:8090/
    timeout: 3000,
})
// 请求拦截器
service.interceptors.request.use(
    (config) => {
        // 在发送请求之前做些什么,例如添加请求头等
        return config;
    },
    (error) => {
        // 对请求错误做些什么
        return Promise.reject(error);
    }
);
// 相应拦截器
service.interceptors.response.use(
    (response) => {
        // 对响应数据做些什么,例如处理错误信息等
        return response;
    },
    (error) => {
        if (error && error.response) {
            switch (error.response.status) {
                case 400:
                    error.message = '400:请求错误'
                    break
                case 403:
                    error.message = '403:拒绝访问'
                    break
                case 404:
                    error.message = `404:请求地址出错: ${error.response.config.url}`
                    break
                case 408:
                    error.message = '408:请求超时'
                    break
                case 500:
                    error.message = '500:服务器内部错误,请联系管理员'
                    break
                case 501:
                    error.message = '501:服务未实现'
                    break
                case 502:
                    error.message = '502:网关错误'
                    break
                case 503:
                    error.message = '503:服务不可用'
                    break
                case 504:
                    error.message = '504:网关超时'
                    break
                case 505:
                    error.message = '505:HTTP版本不受支持'
                    break
                default:
            }
        }
        ElMessage({
            message: error.message,
            type: 'error',
            duration: 3 * 1000,
        })
        console.error(error);

        // 对响应错误做些什么
        return Promise.reject(error);
    }
);

export default service
3、src下新建api文件下,api/home_api.ts
import request from "../utils/axios"
export function getBannerApi(data: any) {
    return request({
        url: "接口地址",
        method: "请求方式",  //(post或者get)
        params:data     //(如果是post请求,直接是data)
    })
}
4、页面引用接口,并请求
<script lang="ts" setup>
import { ref, onMounted, reactive } from "vue"
import * as homeInfoApi from '../../api/home_api';
let newsList = reactive([])
const total = ref(0 as any);
const pageSize = ref(20 as any);
const pageIndex = ref(1 as any);
onMounted(() => {
    getProductData()
})
const getProductData = async () => {
    try {
        // 参数
        let queryParams = {
            limit: pageSize.value,
            offset: pageIndex.value,
            sid: 415,
        }
        // 请求接口
        const response = await homeInfoApi.getBannerApi(queryParams);
        response.data.data.forEach((element: any) => {
            newsList.push(element)
        });
        total.value = response.data.pagination.total;
        console.log(response)
    } catch (error) {
        console.error(error);
    } finally {
    }
}

</script>
八、配置vite.config.ts
import { defineConfig } from 'vite';
import vue from '@vitejs/plugin-vue';

export default ({ command, mode }: { command: string; mode: string }) => {
  const config = defineConfig({
    plugins: [vue()],
    server: {
      port: 8090, // 设置新的端口(前端接口)
      open: true, // 自动打开浏览器
      host: "192.168.1.130",//本地主机地址
      proxy: {
        '/api': {
          target: 'http://192.168.1.131:8081/',   //请求后端接口
          changeOrigin: true,
          rewrite: (path) => path.replace(/^\/api/, ''),
        },
      }
    },
  });
  return config;
};