浅谈vue-router原理
…, 下面这种路由表的写法比较优雅,我把路由单独写在一个文件routes.js .
router/routes.js 文件代码
javascript">
```go
const routes = [
  {
    path: '/',
    redirect: '/recommend'
  },
  {
    path: '/recommend',
    component: () => import('../components/recommend/view.vue')
  },
  {
    path: '/singer',
    component: () => import('../components/singer/view.vue')
  },
  {
    path: '/rank',
    component: () => import('../components/rank/view.vue')
  },
  {
    path: '/search',
    component: () => import('../components/search/view.vue')
  }
]
export default routes
Vue-router原理了解一下:
找到一篇文章,分析的很透彻 从vue-router看前端路由的两种实现,文章写的很好,看完这篇文章 ➕ 看源码应该可以理解,这里根据我浅显的理解概括一下:
vue-router通过hash与History interface两种方式实现前端路由,更新视图但不重新请求页面”是前端路由原理的核心之一,目前在浏览器环境中这一功能的实现主要有两种方式
hash ---- 利用URL中的hash(“#”)
利用History interface在 HTML5中新增的方法, 详情点击
那么,我们要选择用哪种方式呢?
在vue-router中,它提供mode参数来决定采用哪一种方式,选择流程如下:
mode 参数:
默认hash
history 注:如果浏览器不支持history新特性,则采用hash方式
如果不在浏览器环境则使用abstract(node环境下)
mode
router/index.js 文件代码
import Vue from 'vue'
import Router from 'vue-router'
import routes from './routes'
Vue.use(Router)
export default new Router({
// mode: 'history',
routes
})
那么,经过测试,有什么区别呢?
mode:'hash' ,多了 “ # ”
http://localhost:8080/#/recommend
mode:'history'
http://localhost:8080/recommend
小白:这么神奇,不同路由显示,打开确是同一个页面嘛?are you kidding me ?
大菜:哈哈,当你选择mode类型之后,程序会根据你选择的mode 类型创建不同的history对象(HashHistory或HTML5History或AbstractHistory),嘿嘿小伙子,我们看看源码就知道了
// 根据mode确定history实际的类并实例化
// 根据mode确定history实际的类并实例化
switch (mode) {
case 'history':
this.history = new HTML5History(this, options.base)
break
case 'hash':
this.history = new HashHistory(this, options.base, this.fallback)
break
case 'abstract':
this.history = new AbstractHistory(this, options.base)
break
default:
if (process.env.NODE_ENV !== 'production') {
assert(false, `invalid mode: ${mode}`)
}
}
小白:什么HashHistory,什么HTML5History,有什么区别嘛?
大菜:当然是有滴。就例如两个不同的对象,一个擅长画画,一个精通书法。哈哈别急别急,待我慢慢道来。
HashHistory
HashHistory真是身怀绝技,会很多东西。特别是替换路由特别厉害。还可以通过不同的方式,一个是 push ,一个是 replace .
两个方法:HashHistory.push() 和 HashHistory.replace()
**HashHistory.push() **将新路由添加到浏览器访问历史的栈顶
push,入栈顶
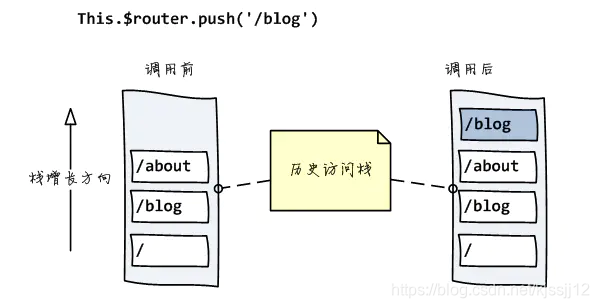
从设置路由改变到视图更新的流程:
$router.push() --> HashHistory.push() --> History.transitionTo() --> History.updateRoute() --> {app._route = route} --> vm.render()
解析:
1 $router.push() //调用方法
2 HashHistory.push() //根据hash模式调用,设置hash并添加到浏览器历史记录(添加到栈顶)(window.location.hash= XXX)
3 History.transitionTo() //监测更新,更新则调用History.updateRoute()
4 History.updateRoute() //更新路由
5 {app._route= route} //替换当前app路由
6 vm.render() //更新视图
HashHistory.replace()
replace()方法与push()方法不同之处在于,它并不是将新路由添加到浏览器访问历史的栈顶,而是替换掉当前的路由
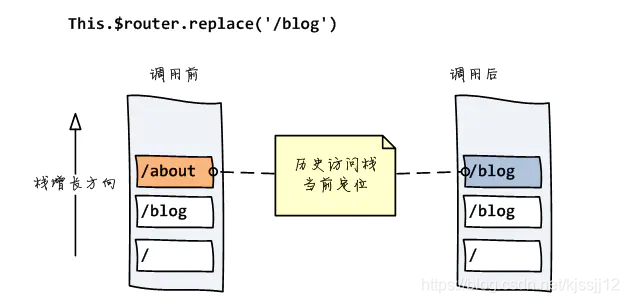
replace,z直接替换
```go
replace (location: RawLocation, onComplete?: Function, onAbort?: Function) {
this.transitionTo(location, route => {
replaceHash(route.fullPath)
onComplete && onComplete(route)
}, onAbort)
}
function replaceHash (path) {
const i = window.location.href.indexOf('#')
window.location.replace(
window.location.href.slice(0, i >= 0 ? i : 0) + '#' + path
)
}
领教了HashHistory的超能力,接下来看下
HTML5History
History interface是浏览器历史记录栈提供的接口,通过back(), forward(), go()等方法,我们可以读取浏览器历史记录栈的信息,进行各种跳转操作。
从HTML5开始,History interface有进一步修炼:pushState(), replaceState() 这下不仅是读取了,还可以对浏览器历史记录栈进行修改:
window.history.pushState(stateObject, title, URL)window.history.replaceState(stateObject, title, URL)
stateObject: 当浏览器跳转到新的状态时,将触发popState事件,该事件将携带这个stateObject参数的副本
title: 所添加记录的标题
URL: 所添加记录的URL
1.push
与hash模式类似,只是将window.hash改为history.pushState
2.replace
与hash模式类似,只是将window.replace改为history.replaceState
3.监听地址变化
在HTML5History的构造函数中监听popState(window.onpopstate)
具体源码分析可以参考上面 说的文档
小白:这样看来,HashHistory和HTML5History两个对象都身怀绝技,都能替换当前路由,我选哪个比较好?
大菜:emmm…,一般来说,hash模式与history模式是差不多的,推荐history模式,理由竟然是:"#" 符号有点丑啊…0_0 ",但是呢,但是呢,我们又不能只是看颜值是吧。
pushState设置的新URL可以是与当前URL同源的任意URL;而hash只可修改#后面的部分,故只可设置与当前同文档的URL
pushState通过stateObject可以添加任意类型的数据到记录中;而hash只可添加短字符串
pushState可额外设置title属性供后续使用
history模式则会将URL修改得就和正常请求后端的URL一样,如后端没有配置对应/user/id的路由处理,则会返回404错误
根据自己的情况选择啊!
作者:Searchen
链接:https://www.jianshu.com/p/4295aec31302
来源:简书
著作权归作者所有。商业转载请联系作者获得授权,非商业转载请注明出处。